1. Overview
This Project Portfolio is used to document the role and contribution of Li Xinze to this project, Patient Book.
Patient Book is a student project done by 5 NUS Year 2 Computer Science students. I am one member of
this project team, T12-2 of AY2018-19 Semester 1. In this team, I am in charge of the User Interface (UI), including
the design, the function and the connection between UI and other components.
Patient Book is a desktop application for doctors. It is an all-in-one software that helps doctors to
manage patient and appointment data. In addition, it assists doctor to make diagnosis by providing information of
symptoms, diseases and drugs. The user interacts with it using a Command Line Interface (CLI), which means users can
enter all the commands by typing. It also has a GUI created with JavaFX. It is written in Java, and has about 20 kLoC.
Patient book allows users to manipulate patient and appointment data in various means such as add, delete,
select, edit, find and list. Certain commands like list and find applies to diseases and drugs as well.
2. Summary of contributions
This section records the enhancements and contributions of LI XINZE to the project.
-
Code Contributed: [code]
-
Main feature implemented : added the appointment management mode and the switching feature between different modes
-
What it does: Allows appointment related data to be displayed. Allows users to switch between the patient management mode and the appointment management mode. Helps the users to switch the mode automatically when they key in the command in the wrong mode.
-
Justification: This feature significantly improves the product because user can clearly separate the data of patients and data of appointments by using the respective mode. The auto-switching feature contributes to the user-friendliness of the product.
-
Highlights: This enhancement adds an entire set of UI on top of the original implementation. It required an in-depth understanding of the work flow of UI and how it can be linked to other components. The auto-switching implementation was challenging as it required enhancement on each command related to patient or appointment without breaking the existing functionality.
-
-
Other contributions:
-
Minor enhancements :
-
Added a
prompt windowthat allows the application to acquire additional information from users (if needed) during appointment addition. The prompt window is a general feature and hence can be used in other means if there will be any further enhancements. -
Added a
person browse panelforpatient management modeand aappointment browse panelforpatient management m to replace the original `display panel. The patient information and appointment notes can be displayed accordingly without accessing the Internet. -
Added
select commandwhich supports the CLI functionality of the product. Select command allows users to select any patient card or appointment card without actually clicking the card.
-
-
Enhancements to existing features:
-
Community:
-
3. Contributions to the User Guide
Given below are sections I contributed to the User Guide. They showcase my ability to write documentation targeting end-users. |
Switch to patient management mode : mode patient
Format: mode patient
Switches the application to patient management mode. In this mode, you can view and manage patients’ data. When you enter a valid command regarding patient in appointment management mode, the application will switch to patient management mode automatically.
Switch to appointment management mode : mode appointment
Format: mode appointment
Switches the application to appointment management mode. In this mode, you can view and manage your patient’s appointments. When you enter a valid command regarding appointment in patient management mode, the application will switch to appointment management mode automatically.
| By default, the list panel only displays appointments in the future. |
Select a patient : select patient
Format: select patient PATIENT_ID
Selects an existing patient and its information will display on the right. If necessary, switches the application to patient management mode. Selecting patient replaces physically clicking an patient card. Hence, you can only select a patient that is displayed on the left.
You may select a deleted patient by first typing list patient all.
|
Examples:
-
select patient p1 -
select patient p29

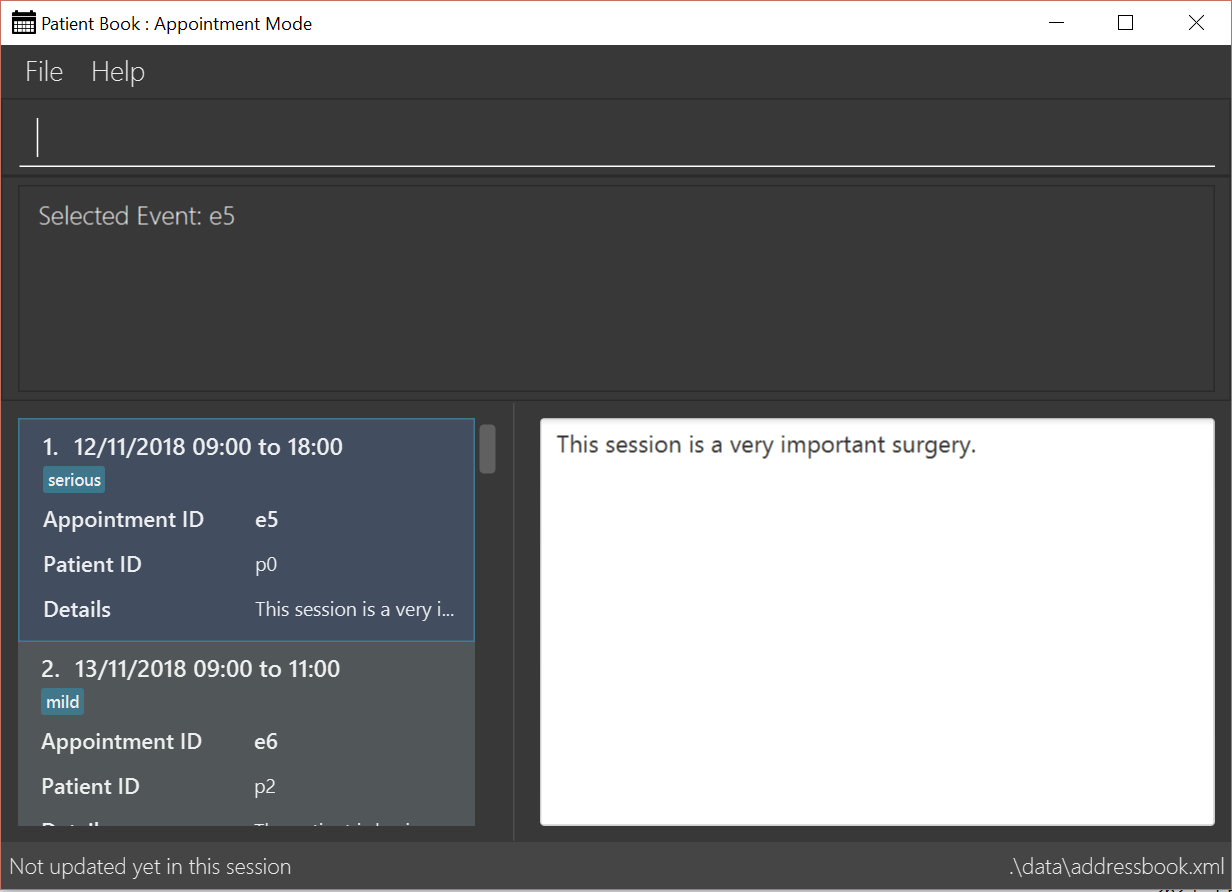
Select an appointment : select appointment
Format: select appointment APPOINTMENT_ID
Selects an existing appointment and its details will display on the right. If necessary, switches the application to appointment management mode. Selecting appointment replaces physically clicking an appointment card. Hence, you can only select an appointment that is displayed on the left.
You may select a past appointment by first typing list appointment all.
|
Examples:
-
select appointment e5 -
select appointment e29
4. Contributions to the Developer Guide
Given below are sections I contributed to the Developer Guide. They showcase my ability to write technical documentation and the technical depth of my contributions to the project. |
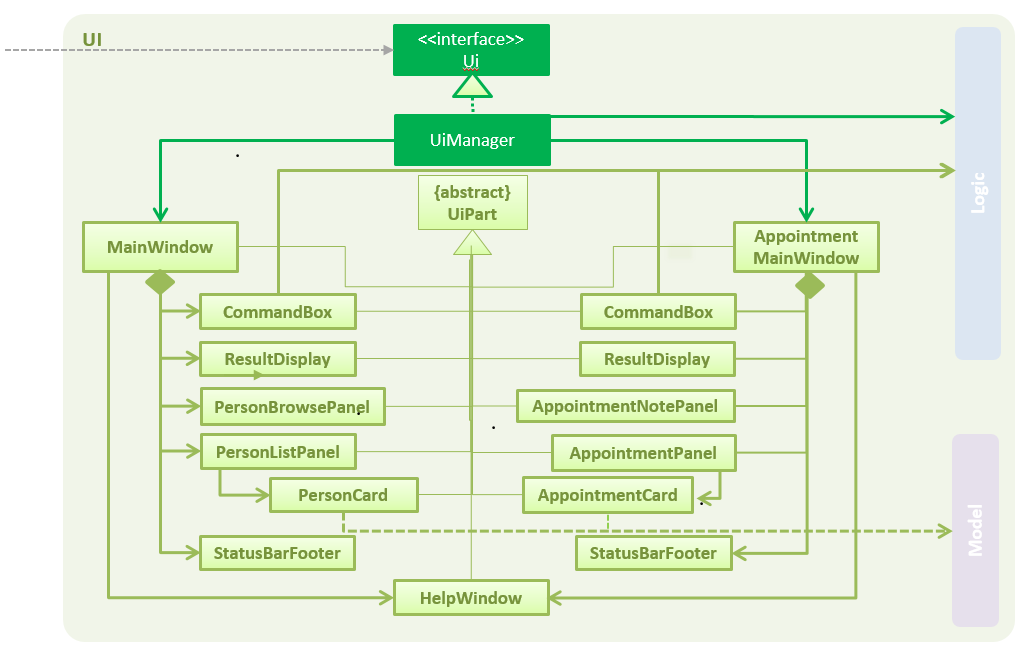
UI component
API : Ui.java
The UI comprises two main interfaces:
-
MainWindow: Supports patient information management
-
ScheduleMainWindow: Supports appointment management
MainWindow is made up of parts e.g.CommandBox, ResultDisplay, PersonListPanel, StatusBarFooter, BrowserPanel
etc. All these, including the MainWindow, inherit from the abstract UiPart class.
ScheduleMainWindow consists of parts as well, including its own copy of CommandBox, ResultDisplay,
and a ScheduleListPanel.
The UI component uses JavaFx UI framework. The layout of these UI parts are defined in matching .fxml files that are
in the src/main/resources/view folder. For example, the layout of the
MainWindow is specified in
MainWindow.fxml
The UI component,
-
Executes user commands using the
Logiccomponent. -
Binds itself to some data in a
Model(EitherAddressBookModelorScheduleModel) so that the UI can auto-update when data in theModelchanges. -
Responds to events raised from various parts of the App and updates the UI accordingly.
On-the-fly Switching between Modes
Current Implementation
This feature enables the software to separate patient information from appointment information clearly. The two modes
are patient management mode and appointment management mode. Users can switch between one mode to the other mode using
mode command. In addition, the feature supports auto-switch function. In other words, when user type in a valid command
(add, delete, select, find or edit) to manipulate appointments in patient mode, the software will switch to appointment
mode automatically, and vice versa.
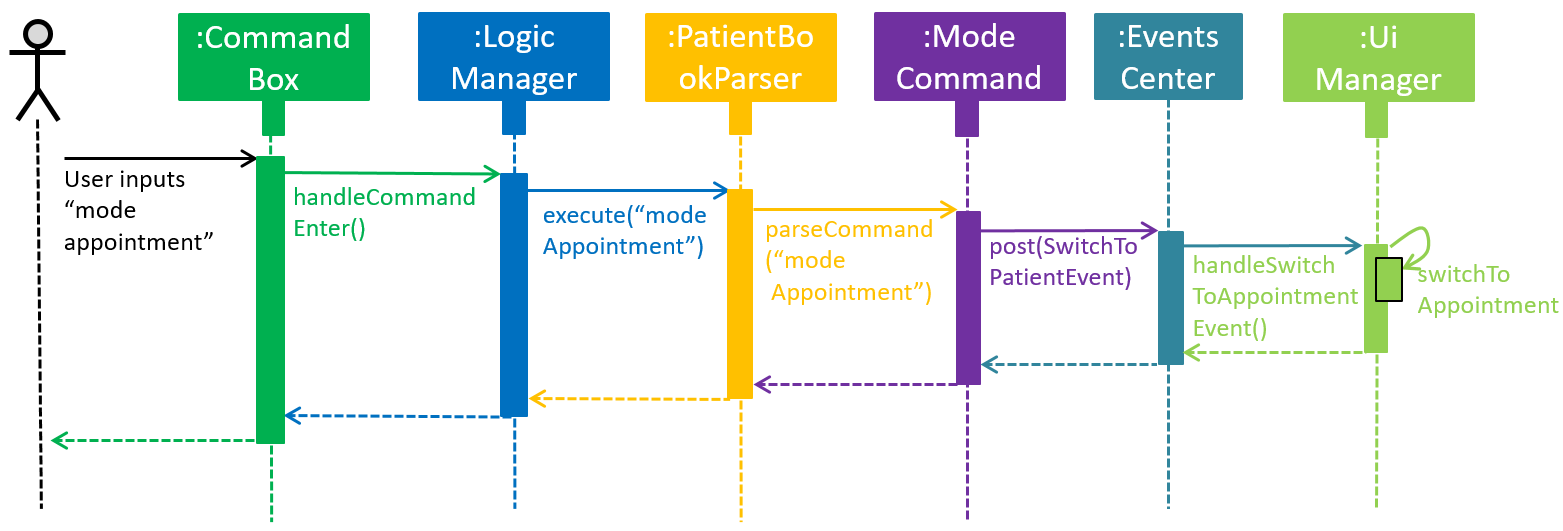
The switching feature is mainly implemented using the eventbus and subscriber approach. The main logic of the switch is implemented inside the UiManager class.The UiManager class maintains an instance of each patient mode window and appointment mode window and each has an unique stage. When the software is initialised, both windows are initialised, but only the patient window is shown as it is the default mode.
There are three steps involved in the processing of the switch feature:
Step 1. Event Post: When user types in a mode command,the ModeCommand will post a switchToPatientEvent or
SwitchToAppointmentEvent to the event center.
 @Override
    public CommandResult execute(AddressBookModel addressBookModel, ScheduleModel scheduleModel,
                                 DiagnosisModel diagnosisModel, CommandHistory history) throws CommandException {
        requireNonNull(addressBookModel);
        requireNonNull(scheduleModel);
        if (this.cmdType.equals(CMDTYPE_PATIENT)) {
            EventsCenter.getInstance().post(new SwitchToPatientEvent());
            return new CommandResult(MESSAGE_PATIENT_SWITCH_SUCCESS);
        } else if (this.cmdType.equals(CMDTYPE_APPOINTMENT)) {
            EventsCenter.getInstance().post(new SwitchToAppointmentEvent());
            return new CommandResult(MESSAGE_SCHEDULE_SWITCH_SUCCESS);
        } else {
            throw new CommandException("Unexpected command type: should have been caught in ModeCommandParser.");
        }
    }
Step 2. Event Handle: UiManager is registered as an event handler. It subscribes from the events center and call relevant method (switchToPatient or switchToAppointment).
Step 3. Switch Handle: Inside the switch methods, the current window will be hided and the other window will be shown.
 @Override
    public void switchToAppointment() {
        logger.info("Switching to Appointment Mode");
        try {
            appointmentMainWindow.show();
            appointmentMainWindow.setShowing(true);
            appointmentMainWindow.setNotePanelToDefault();
            mainWindow.hide();
            mainWindow.setShowing(false);
        } catch (Throwable e) {
            logger.severe(StringUtil.getDetails(e));
            showFatalErrorDialogAndShutdown("Fatal error during switching", e);
        }
    }
The implementation allows the window to know whether it is at the showing state. This is mainly to solve the problem
that help window is initialised from both windows when help command is called. Hence, when switch methods are called,
the showing state of the windows should also be updated. In addition, the feature that each window knows its showing
state is also helpful for future refinements.
|
The auto-switch feature is implemented using similar approach. When a valid command is executed, a event is posted to the event center to switch to the corresponding mode. The way switch method is implemented allows the current showing window not to be checked. For now, when user switch from patient mode to patient mode, the method will still be called but it does not reflect any change in the UI. One way to refine is to allow software to check the current showing state and if user switch from one mode to the same mode, an exception will be thrown. This implementation is, however, not very necessary.
Design Considerations
Aspect: Switching mode or switching panel
-
Alternative 1 (current choice): Having an entire set of UI, in this case `Appointment Main Window`to hold the appointment related data.
-
Pros: It is more flexible for future change. It would be easier to add more modes in the future if needed. The design of the UI for various modes can be modified because they are independent from one another.
-
Cons: It is more difficult to implement.
-
-
Alternative 2 : Only adding in an appointment panel and switching the panel if necessary.
-
Pros:It is easier to implement.
-
Cons: The program would be constrained if more modes are to be added in the future.
-
Aspect: Execution of mode command
-
Alternative 1 (current choice): Posting the switch mode event regardless of the current mode that user is in.
-
Pros: The logic do not have to be aware of the UI component and hence reduce coupling.
-
Cons: Users can switch from one mode to the same mode.
-
-
Alternative 2 : The mode command maintains an instance of the UiManager and keep tracks of the current window that is showing. When user requires to switch mode, identifies the current mode and generate exception if the user is already in this mode.
-
Pros: It can respond more accurately when user wish to switch mode.
-
Cons: It increases dependency on the code unnecessarily.
-
Mode
-
Switching to appointment management mode
-
Test case:
mode appointment
Expected: Software is switched to appointment management mode. Success message is shown in the display panel. Timestamp in the status bar is not updated. -
Test case:
mode damith
Expected: Software remains at the current mode. Error details are shown in the display panel. Timestamp in the status bar is not updated.
-
-
Switching to patient management mode
-
Test case:
mode patient
Expected: Software is switched to patient management mode. Success message is shown in the display panel. Timestamp in the status bar is not updated. -
Test case:
mode damith
Expected: Software remains at the current mode. Error details are shown in the display panel. Timestamp in the status bar is not updated.
-
Select
-
Selecting a patient(Assume that only patient p0 is present in the person list panel)
-
Test case:
select patient p0
Expected: Patient p0 is selected. Its card lights up with a blue color. The details of patient p0 are shown in the person browse panel. Success message is shown in the display panel. Timestamp in the status bar is not updated. -
Test case:
select p0
Expected: No patient is being selected. Error details are shown in the display panel. Timestamp in the status bar is not updated. -
Other incorrect select patient commands to try:
select patient 0,select patient p1,select patient e0
Expected: Similar to previous
-
-
Selecting an appointment(Assume that only appointment e0 is present in the appointment panel)
-
Test case:
select appointment e0
Expected: Appointment e0 is selected. Its card lights up with a blue color. The note of appointment e0 are shown in the appointment note panel. Success message is shown in the display panel. Timestamp in the status bar is not updated. -
Test case:
select e0
Expected: Expected: No appointment is being selected. Error details are shown in the display panel. Timestamp in the status bar is not updated. -
Other incorrect select patient commands to try:
select appointment 0,select appointment e1,select appointment p0
Expected: Similar to previous
-