By: T12-2 Since: Aug 2018 Licence: MIT
1. Setting up
1.1. Prerequisites
-
JDK
9or laterJDK 10on Windows will fail to run tests in headless mode due to a JavaFX bug. Windows developers are highly recommended to use JDK9. -
IntelliJ IDE
IntelliJ by default has Gradle and JavaFx plugins installed.
Do not disable them. If you have disabled them, go toFile>Settings>Pluginsto re-enable them.
1.2. Setting up the project in your computer
-
Fork this repo, and clone the fork to your computer
-
Open IntelliJ (if you are not in the welcome screen, click
File>Close Projectto close the existing project dialog first) -
Set up the correct JDK version for Gradle
-
Click
Configure>Project Defaults>Project Structure -
Click
New…and find the directory of the JDK
-
-
Click
Import Project -
Locate the
build.gradlefile and select it. ClickOK -
Click
Open as Project -
Click
OKto accept the default settings -
Open a console and run the command
gradlew processResources(Mac/Linux:./gradlew processResources). It should finish with theBUILD SUCCESSFULmessage.
This will generate all resources required by the application and tests. -
Open
XmlAdaptedPerson.javaandMainWindow.javaand check for any code errors-
Due to an ongoing issue with some of the newer versions of IntelliJ, code errors may be detected even if the project can be built and run successfully
-
To resolve this, place your cursor over any of the code section highlighted in red. Press ALT+ENTER, and select
Add '--add-modules=…' to module compiler optionsfor each error
-
-
Repeat this for the test folder as well (e.g. check
XmlUtilTest.javaandHelpWindowTest.javafor code errors, and if so, resolve it the same way)
1.3. Verifying the setup
-
Run the
seedu.address.MainAppand try a few commands -
Run the tests to ensure they all pass.
1.4. Configurations to do before writing code
1.4.1. Configuring the coding style
This project follows oss-generic coding standards. IntelliJ’s default style is mostly compliant with ours but it uses a different import order from ours. To rectify,
-
Go to
File>Settings…(Windows/Linux), orIntelliJ IDEA>Preferences…(macOS) -
Select
Editor>Code Style>Java -
Click on the
Importstab to set the order-
For
Class count to use import with '*'andNames count to use static import with '*': Set to999to prevent IntelliJ from contracting the import statements -
For
Import Layout: The order isimport static all other imports,import java.*,import javax.*,import org.*,import com.*,import all other imports. Add a<blank line>between eachimport
-
Optionally, you can follow the UsingCheckstyle.adoc document to configure Intellij to check style-compliance as you write code.
1.4.2. Updating documentation to match your fork
If you plan to develop this fork as a separate product (i.e. instead of contributing to CS2103-AY1819-T12-2/main), you should do the following:
-
Configure the site-wide documentation settings in
build.gradle, such as thesite-name, to suit your own project. -
Replace the URL in the attribute
repoURLinDeveloperGuide.adocandUserGuide.adocwith the URL of your fork.
1.4.3. Setting up CI
Set up Travis to perform Continuous Integration (CI) for your fork. See UsingTravis.adoc to learn how to set it up.
After setting up Travis, you can optionally set up coverage reporting for your team fork (see UsingCoveralls.adoc).
| Coverage reporting could be useful for a team repository that hosts the final version but it is not that useful for your personal fork. |
Optionally, you can set up AppVeyor as a second CI (see UsingAppVeyor.adoc).
| Having both Travis and AppVeyor ensures your App works on both Unix-based platforms and Windows-based platforms (Travis is Unix-based and AppVeyor is Windows-based) |
2. Design
2.1. Architecture
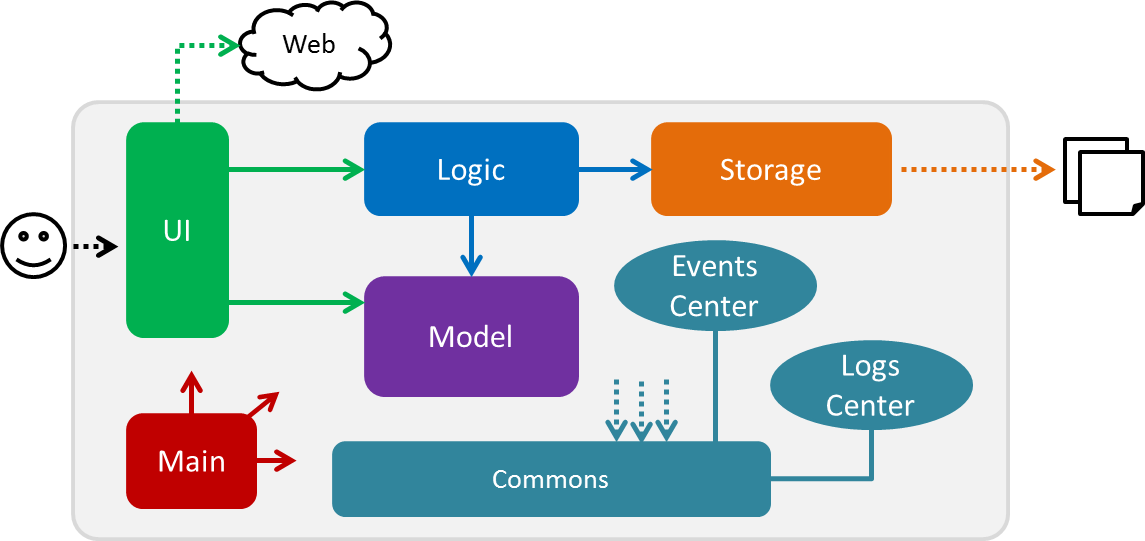
The Architecture Diagram given above explains the high-level design of the App. Given below is a quick overview of each component.
The .pptx files used to create diagrams in this document can be found in the diagrams folder. To update a diagram, modify the diagram in the pptx file, select the objects of the diagram, and choose Save as picture.
|
Main has only one class called MainApp. It is responsible for,
-
At app launch: Initializes the components in the correct sequence, and connecting them up with each other.
-
At shut down: Shutting down the components and invoking cleanup methods where necessary.
Commons represents a collection of classes used by multiple other components. Two of those classes play important roles at the architecture level.
-
EventsCenter: This class (written using Google’s Event Bus library) is used by components to communicate with other components using events (i.e. a form of Event Driven design) -
LogsCenter: This class is used by many classes to write log messages to the App’s log file.
The rest of the App consists of four components.
Each of the four components
-
Defines its API in an
interfacewith the same name as the Component. -
Exposes its functionality using a
{Component Name}Managerclass.
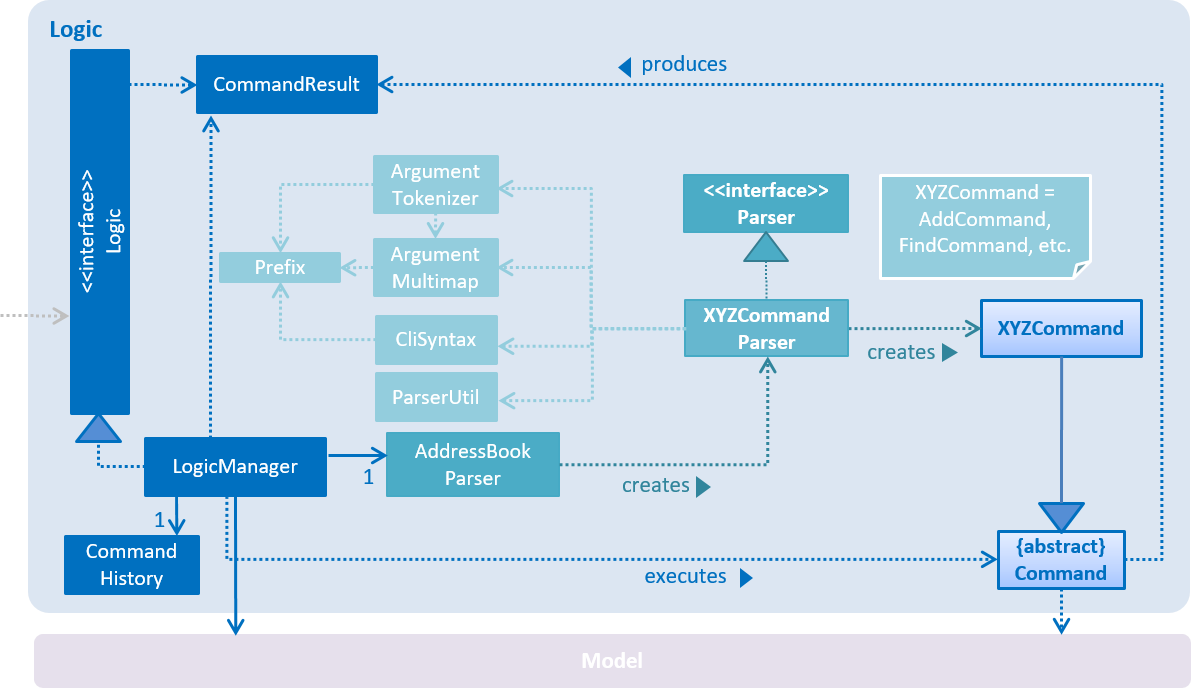
For example, the Logic component (see the class diagram given below) defines it’s API in the Logic.java interface and exposes its functionality using the LogicManager.java class.
Events-Driven nature of the design
The Sequence Diagram below shows how the components interact for the scenario where the user issues the command delete 1.
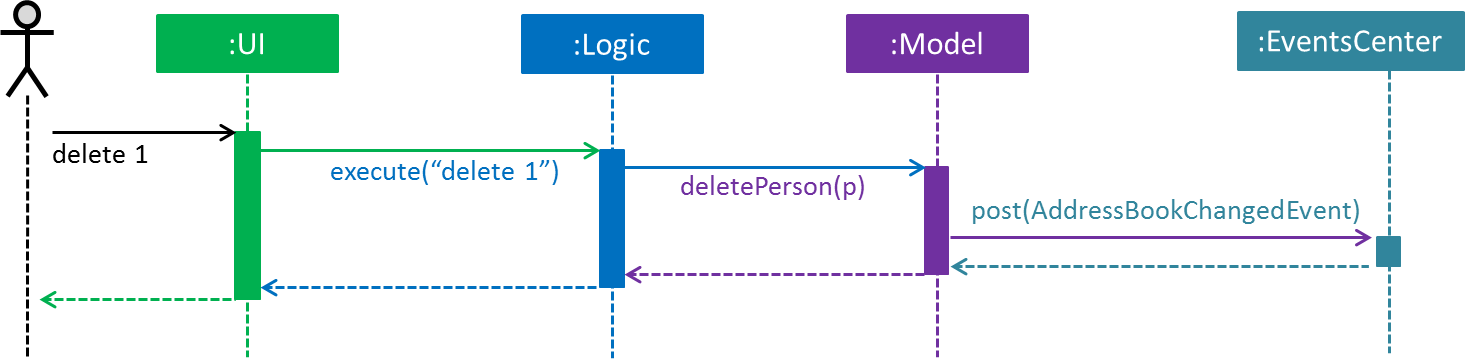
delete 1 command (part 1)
Note how the AddressBookModel simply raises a AddressBookChangedEvent when the Address Book data are changed, instead of asking the Storage to save the updates to the hard disk.
|
The diagram below shows how the EventsCenter reacts to that event, which eventually results in the updates being saved to the hard disk and the status bar of the UI being updated to reflect the 'Last Updated' time.
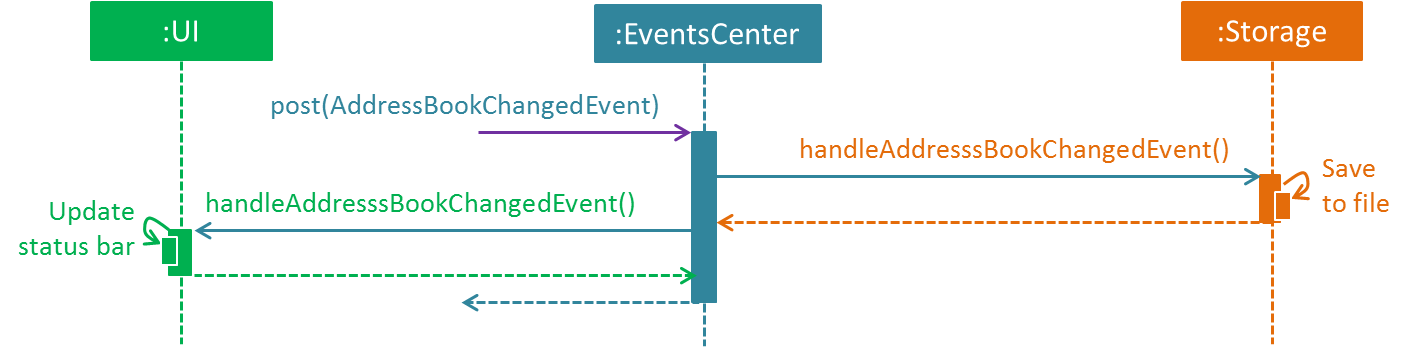
delete 1 command (part 2)
Note how the event is propagated through the EventsCenter to the Storage and UI without AddressBookModel having to be coupled to either of them. This is an example of how this Event Driven approach helps us reduce direct coupling between components.
|
The sections below give more details of each component.
2.2. UI component
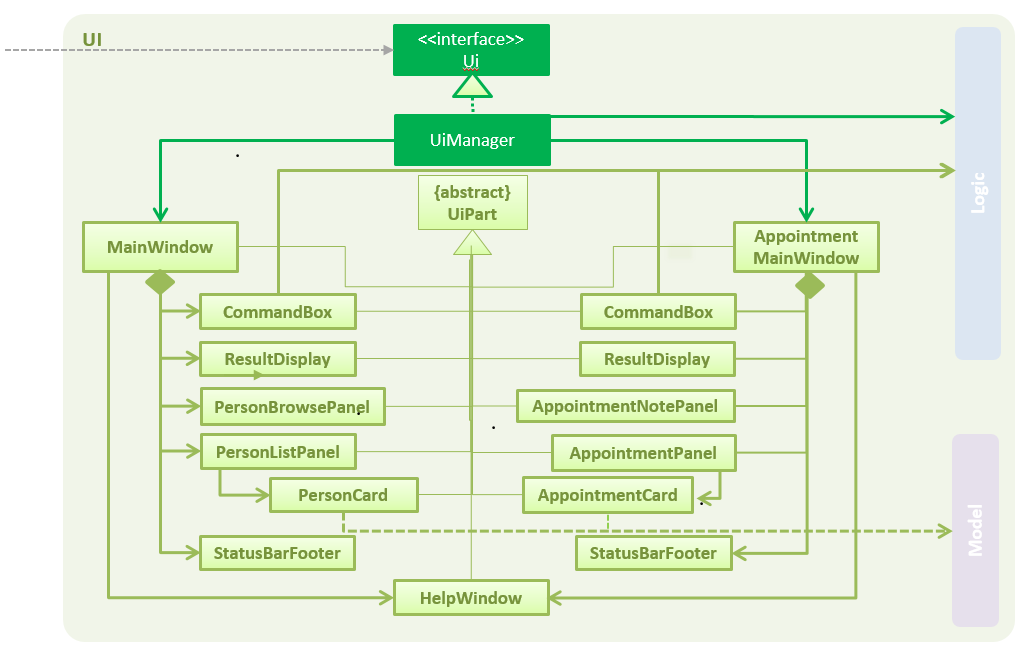
API : Ui.java
The UI comprises two main interfaces:
-
MainWindow: Supports patient information management
-
ScheduleMainWindow: Supports appointment management
MainWindow is made up of parts e.g.CommandBox, ResultDisplay, PersonListPanel, StatusBarFooter, BrowserPanel
etc. All these, including the MainWindow, inherit from the abstract UiPart class.
ScheduleMainWindow consists of parts as well, including its own copy of CommandBox, ResultDisplay,
and a ScheduleListPanel.
The UI component uses JavaFx UI framework. The layout of these UI parts are defined in matching .fxml files that are
in the src/main/resources/view folder. For example, the layout of the
MainWindow is specified in
MainWindow.fxml
The UI component,
-
Executes user commands using the
Logiccomponent. -
Binds itself to some data in a
Model(EitherAddressBookModelorScheduleModel) so that the UI can auto-update when data in theModelchanges. -
Responds to events raised from various parts of the App and updates the UI accordingly.
2.3. Logic component
API :
Logic.java
-
Logicuses theAddressBookParserclass to parse the user command. -
This results in a
Commandobject which is executed by theLogicManager. -
The command execution can affect the
Model(e.g. adding a person) and/or raise events. -
The result of the command execution is encapsulated as a
CommandResultobject which is passed back to theUi.
Given below is the Sequence Diagram for interactions within the Logic component for the execute("delete 1") API call.
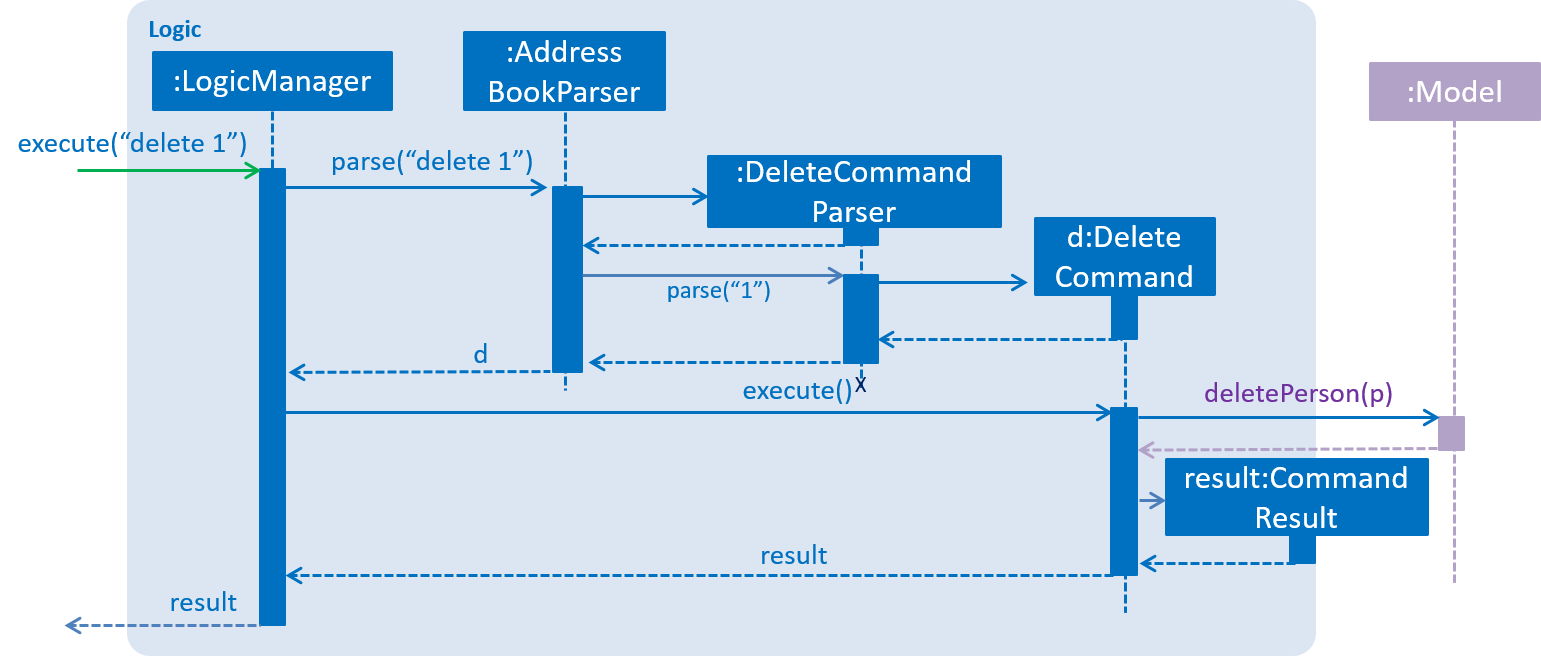
delete 1 Command2.4. Model component
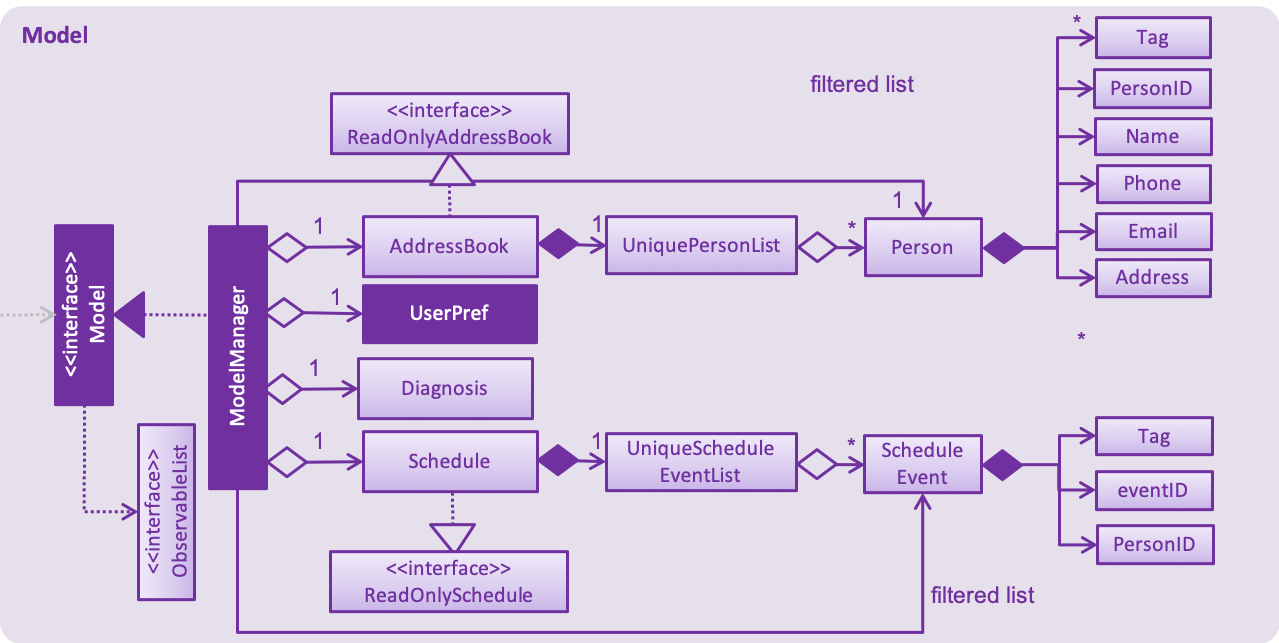
API : Model.java
The Model,
-
stores a
UserPrefobject that represents the user’s preferences. -
stores the Address Book data.
-
exposes an unmodifiable
ObservableList<Person>that can be 'observed' e.g. the UI can be bound to this list so that the UI automatically updates when the data in the list change. -
does not depend on any of the other three components.
As a more OOP addressBookModel, we can store a Tag list in Address Book, which Person can reference. This would allow Address Book to only require one Tag object per unique Tag, instead of each Person needing their own Tag object. An example of how such a addressBookModel may look like is given below.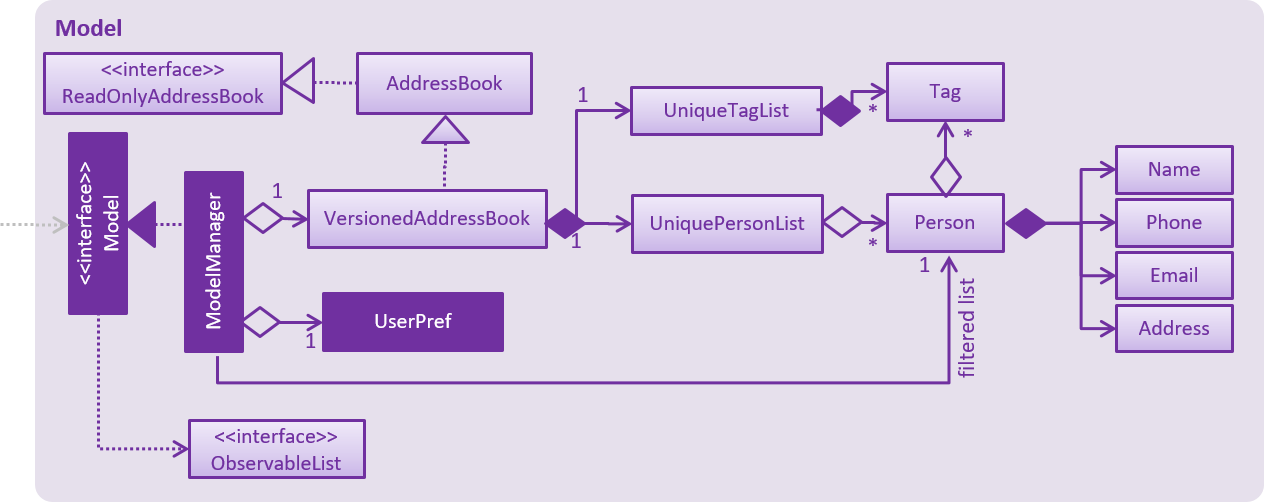
|
2.5. Storage component
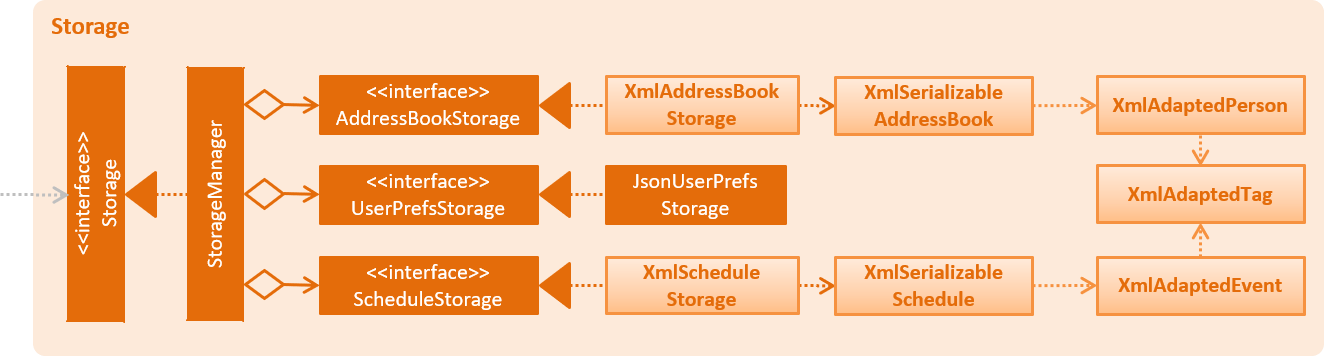
API : Storage.java
The Storage component,
-
can save
UserPrefobjects in json format and read it back. -
can save the Address Book data in xml format and read it back.
2.6. Common classes
Classes used by multiple components are in the seedu.addressbook.commons package.
3. Implementation
This section describes some noteworthy details on how certain features are implemented.
3.1. On-the-fly Switching between Modes
3.1.1. Current Implementation
This feature enables the software to separate patient information from appointment information clearly. The two modes
are patient management mode and appointment management mode. Users can switch between one mode to the other mode using
mode command. In addition, the feature supports auto-switch function. In other words, when user type in a valid command
(add, delete, select, find or edit) to manipulate appointments in patient mode, the software will switch to appointment
mode automatically, and vice versa.
The switching feature is mainly implemented using the eventbus and subscriber approach. The main logic of the switch is implemented inside the UiManager class.The UiManager class maintains an instance of each patient mode window and appointment mode window and each has an unique stage. When the software is initialised, both windows are initialised, but only the patient window is shown as it is the default mode.
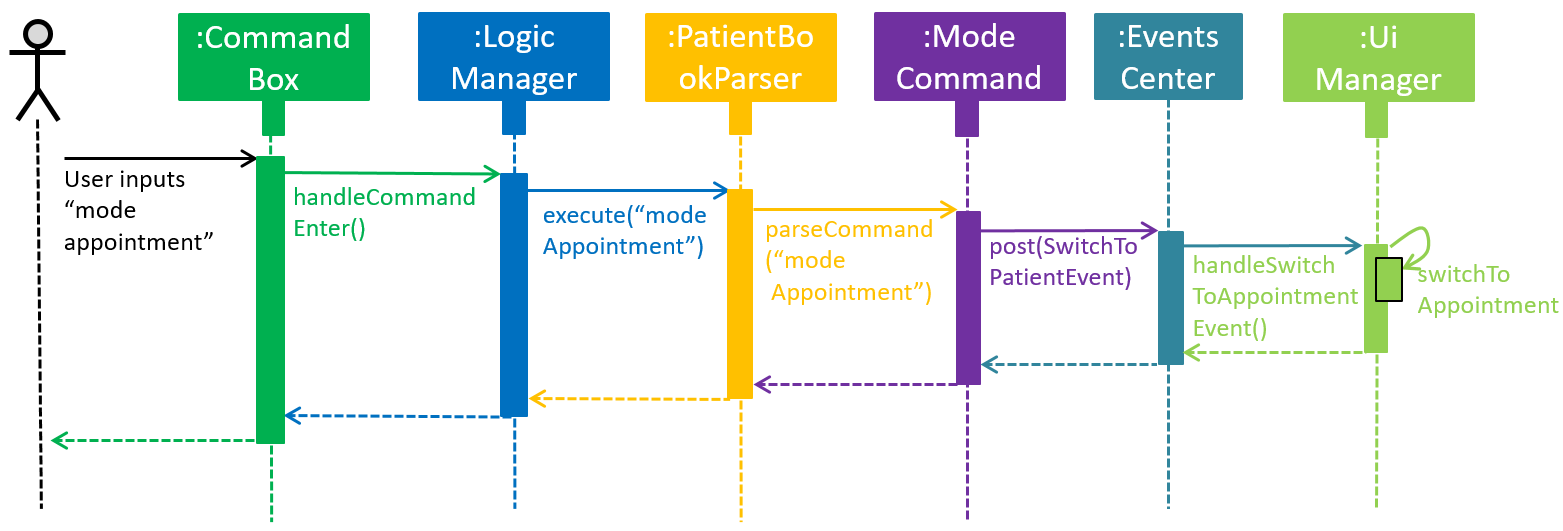
There are three steps involved in the processing of the switch feature:
Step 1. Event Post: When user types in a mode command,the ModeCommand will post a switchToPatientEvent or
SwitchToAppointmentEvent to the event center.
 @Override
    public CommandResult execute(AddressBookModel addressBookModel, ScheduleModel scheduleModel,
                                 DiagnosisModel diagnosisModel, CommandHistory history) throws CommandException {
        requireNonNull(addressBookModel);
        requireNonNull(scheduleModel);
        if (this.cmdType.equals(CMDTYPE_PATIENT)) {
            EventsCenter.getInstance().post(new SwitchToPatientEvent());
            return new CommandResult(MESSAGE_PATIENT_SWITCH_SUCCESS);
        } else if (this.cmdType.equals(CMDTYPE_APPOINTMENT)) {
            EventsCenter.getInstance().post(new SwitchToAppointmentEvent());
            return new CommandResult(MESSAGE_SCHEDULE_SWITCH_SUCCESS);
        } else {
            throw new CommandException("Unexpected command type: should have been caught in ModeCommandParser.");
        }
    }
Step 2. Event Handle: UiManager is registered as an event handler. It subscribes from the events center and call relevant method (switchToPatient or switchToAppointment).
Step 3. Switch Handle: Inside the switch methods, the current window will be hided and the other window will be shown.
 @Override
    public void switchToAppointment() {
        logger.info("Switching to Appointment Mode");
        try {
            appointmentMainWindow.show();
            appointmentMainWindow.setShowing(true);
            appointmentMainWindow.setNotePanelToDefault();
            mainWindow.hide();
            mainWindow.setShowing(false);
        } catch (Throwable e) {
            logger.severe(StringUtil.getDetails(e));
            showFatalErrorDialogAndShutdown("Fatal error during switching", e);
        }
    }
The implementation allows the window to know whether it is at the showing state. This is mainly to solve the problem
that help window is initialised from both windows when help command is called. Hence, when switch methods are called,
the showing state of the windows should also be updated. In addition, the feature that each window knows its showing
state is also helpful for future refinements.
|
The auto-switch feature is implemented using similar approach. When a valid command is executed, a event is posted to the event center to switch to the corresponding mode. The way switch method is implemented allows the current showing window not to be checked. For now, when user switch from patient mode to patient mode, the method will still be called but it does not reflect any change in the UI. One way to refine is to allow software to check the current showing state and if user switch from one mode to the same mode, an exception will be thrown. This implementation is, however, not very necessary.
3.1.2. Design Considerations
Aspect: Switching mode or switching panel
-
Alternative 1 (current choice): Having an entire set of UI, in this case `Appointment Main Window`to hold the appointment related data.
-
Pros: It is more flexible for future change. It would be easier to add more modes in the future if needed. The design of the UI for various modes can be modified because they are independent from one another.
-
Cons: It is more difficult to implement.
-
-
Alternative 2 : Only adding in an appointment panel and switching the panel if necessary.
-
Pros:It is easier to implement.
-
Cons: The program would be constrained if more modes are to be added in the future.
-
Aspect: Execution of mode command
-
Alternative 1 (current choice): Posting the switch mode event regardless of the current mode that user is in.
-
Pros: The logic do not have to be aware of the UI component and hence reduce coupling.
-
Cons: Users can switch from one mode to the same mode.
-
-
Alternative 2 : The mode command maintains an instance of the UiManager and keep tracks of the current window that is showing. When user requires to switch mode, identifies the current mode and generate exception if the user is already in this mode.
-
Pros: It can respond more accurately when user wish to switch mode.
-
Cons: It increases dependency on the code unnecessarily.
-
3.2. Natural Language Processing for Adding an Appointment
This feature facilitates scheduling, which enables the user to add appointments into the schedule system with user input phrased in natural expressions, and does so in a conversational process enabled by several prompt windows.
3.2.1. Current Implementation
This feature currently mainly implements a ScheduleEvent parser which parses natural language user input, and creates the intended ScheduleEvent object to be stored.
There are five steps involved in the processing of this feature:
Step 1. Breaking Down: User input is broken down into sub-fields, namely, patient and time.
Step 2. Patient Parsing: User input for patient is parsed into the corresponding PersonId object.
Step 3. Time Parsing: User input for time is parsed into a Pair<Calendar> object.
Step 4. Further Prompting: User is prompted with two prompt windows where tags and additional notes can be added.
Step 5. Generating Appointment: The resulting ScheduleEvent object corresponding to all user input is created.
The following is an example of a use case, and how the mechanism behaves:
User Input: add appointment for David Lee next week.
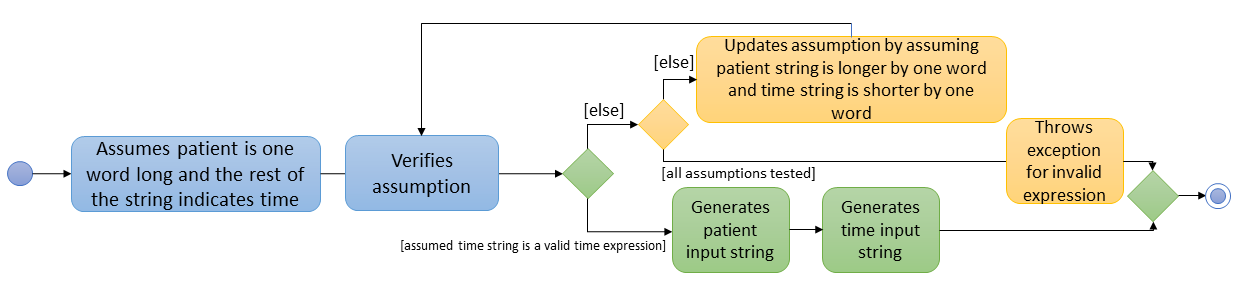
Step 1. Breaking Down: The user input string, starting with for, is passed into a ScheduleEventParser object, and broken down into meaningful substrings for patient and time respectively:
-
Programme starts with assuming that the substring for identifying the patient is only one word long, and the remaining string following that one word all the way to the end of the string is the input for time. In this case,
Davidis the assumed patient substring andLee next weekis the assumed time substring. -
Programme takes the assumed time substring,
Lee next week, and checks if it is a valid time expression. -
As a match cannot be found, it means that the assumed demarcation between patient and time inputs is incorrect. Programme makes another attempt by assuming the patient substring is longer by one word (i.e.
David Lee) and the time substring is shorter by one word (i.e.next week). It takes the new assumed time substring and checks its validity again. -
As a match is found this time, it indicates that the assumption is correct.
David Leewill be carried forward to the Patient Parsing step whilenext weekwill be carried forward to the Time Parsing step. -
In other cases where a match cannot be found after all assumptions have been tested, an exception will be thrown indicating that the user has not used an accepted expression.
The activity diagram below illustrates this process:
Step 2. Patient Parsing: The string David Lee is parsed and converted into the corresponding PersonId object:
-
Programme uses this string as the search string to create a new
MatchPersonPredicateobject which is then used to filter the list of patients. -
If only one patient can be matched, the
PersonIdof the patient is immediately returned. -
If multiple patients can be matched, programme passes the list of matched patients as a
Stringinto aPromptobject, where the list is displayed to the user in aPromptWindow. User is expected to enter the ID of the intended patient. ThePersonIDof the final intended patient is returned.
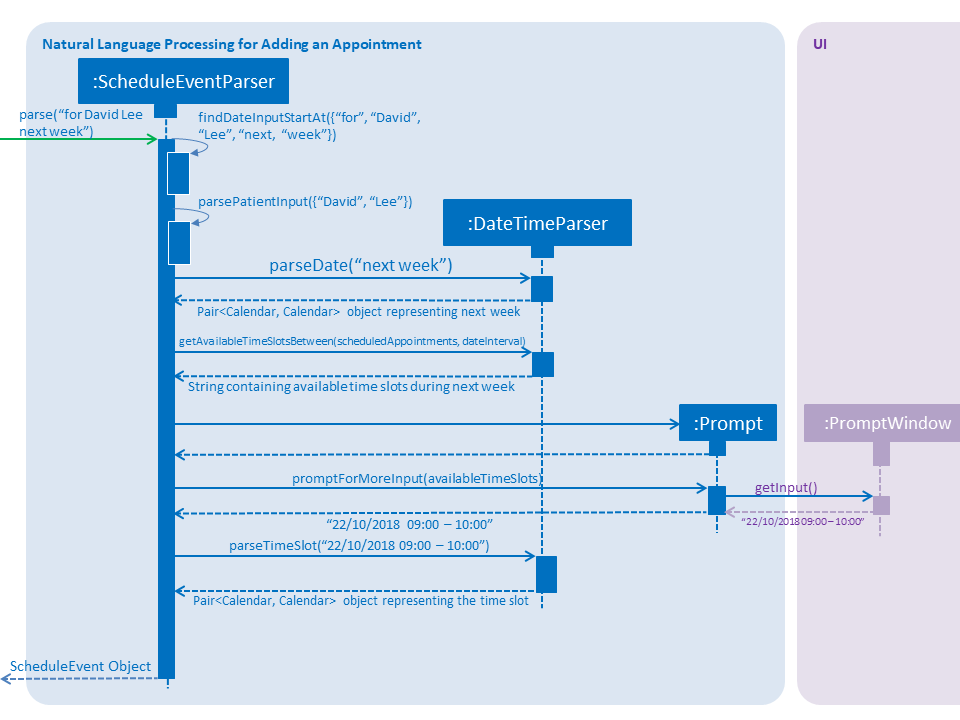
Step 3. Time Parsing: The string next week is passed to a DateTimeParser object where it is parsed and converted into a Pair<Calendar> object to represent the user’s chosen time slot for the appointment:
-
Programme executes a keyword search and invokes the method
getWeekDates(currentTime, 1), where it convertsnext weekinto a datetime range, by doing relevant calculations on theCalendarobject which represents the current time. For instance, if the command is executed on 16/10/2018,next weekbecomes a datetime range from 22/10/2018 09:00 - 28/10/2018 18:00. This range takes into consideration the doctor’s working hours. -
Programme searches the list of already scheduled appointments within the time range obtained. It finds a list of available time periods by taking the complement within that range (taking into consideration the doctor’s working hours), and passes the list as a
Stringinto aPromptobject, where the list is displayed to the user in aPromptWindow. -
User inputs a specific time slot from the list of available time periods. For instance, user inputs
22/10/2018 09:00 - 10:00. This string is then passed back toDateTimeParserand converted into aPair<Calendar>object that represents this time slot, by invoking the methodparseTimeSlot(timeSlotString).
Step 4. Further Prompting: The user is presented with two more PromptWindow, where they can provide further inputs for tags and additional notes for the appointment. This is done through a simple I/O mechanism.
Step 5. Generating Appointment: Results from the previous steps are used to fill the attributes of a newly created ScheduleEvent object which is then returned.
The sequence diagram below summarises this feature. Note that step 4 and 5 are omitted in the diagram as they are relatively trivial:
3.2.2. Design Considerations
Aspect: Abstraction over time slot
-
Alternative 1 (current choice): Use a
Pair<Calendar>where thekeyandvaluerepresent the start time and end time of a time slot respectively.-
Pros: It is easy to implement.
-
Cons:
keyandvalueare not intuitive in this context, hence it is difficult for other developers to understand.
-
-
Alternative 2: Define a
Durationclass which has thePair<Calendar>as an attribute, providing an additional layer of abstraction.-
Pros: It is easy for new developers to understand the context by defining methods such as
getStartTime(), at the same time not exposing the internal implementation. -
Cons: Defining this class may be not worth the effort as it has only one use case (as an attribute in
ScheduleEvent) in the application.
-
Aspect: Algorithm to find available time slots given a list of already scheduled appointments in an interval
-
Alternative 1 (current choice): Loop through the list of appointments twice. The first time is to find available time slots in days where there are scheduled appointments. The second time is to find completely free days. The code snippets show the two loops.
private List<Pair<Calendar>> getAvailableSlotList(List<ScheduleEvent> scheduledAppts, Pair<Calendar> dateInterval) {
    // ...
    for (int i = 0; i < scheduledAppts.size() - 1; i++) {
        // ...
        findAvailableSlotsBetweenTwoAppts(availableSlots, currentEnd, nextStart);
    }
    // ...
    findCompletelyAvailableDays(scheduledAppts, dateInterval, availableSlots);
}
private void findCompletelyAvailableDays(List<ScheduleEvent> scheduledAppts, Pair<Calendar> dateInterval, List<Pair<Calendar>> availableSlots) { // ... for (ScheduleEvent appt: scheduledAppts) { // ... } // ... }-
Pros: It is easy to implement.
-
Cons: Performance is adversely affected because the list has to be searched through twice.
-
-
Alternative 2: Keep a day pointer and loop through the list of appointments only once to find all available time slots.
-
Pros: It enhances performance because the list is searched through only once.
-
Cons: It is harder to implement, due to the difficulties in manipulating
java.util.Calendaras a day pointer. Edge cases such as crossing the year boundaries are difficult to handle.
-
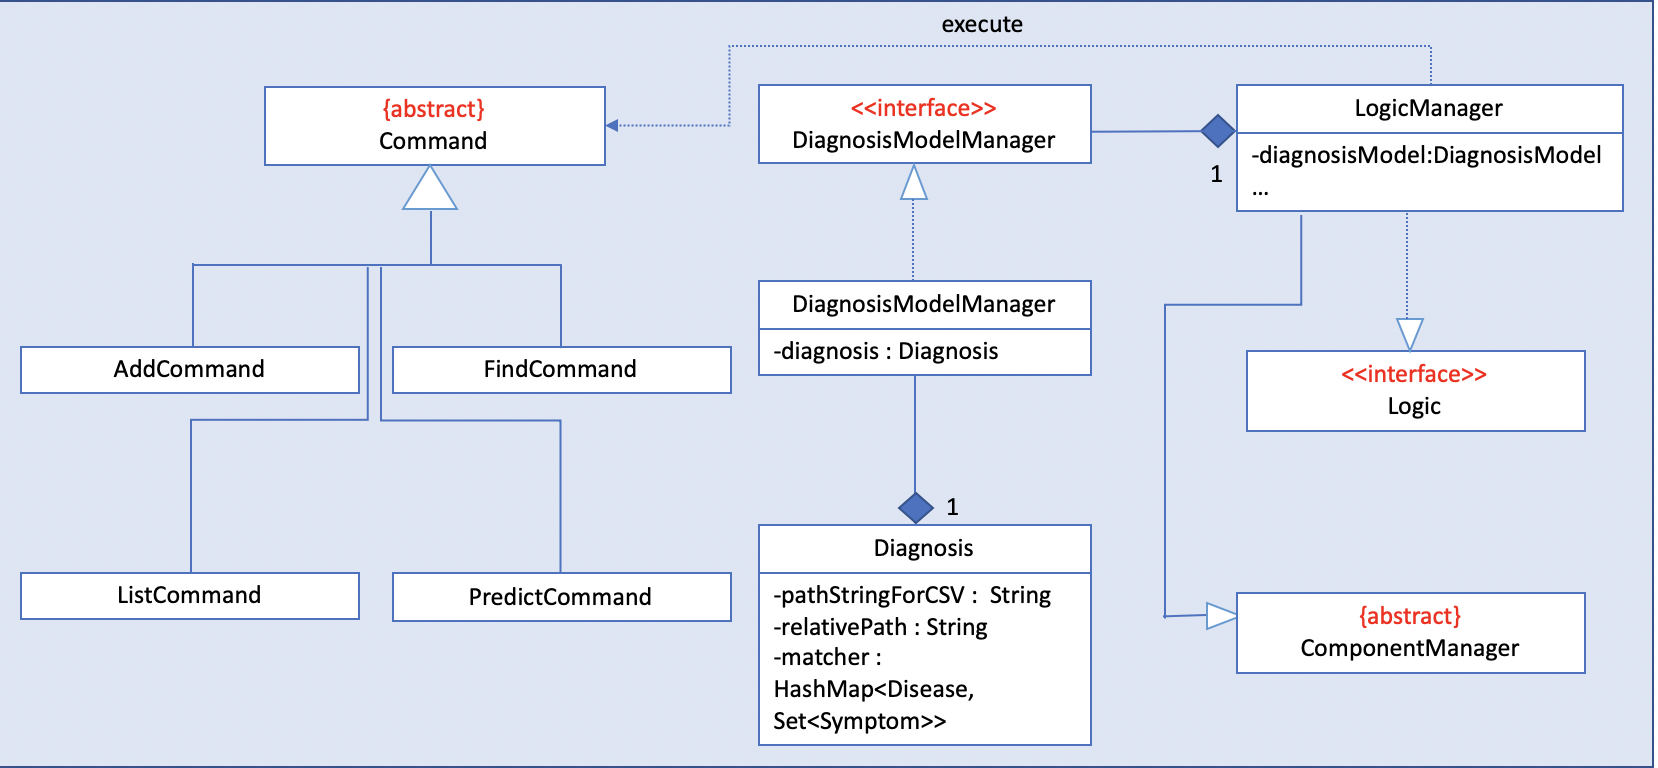
3.3. Diagnosis
3.3.1. Current Implementation
The diagnosis feature is facilitated by Diagnosis class. This class contains a private attribute called
matcher of type HashMap<Disease, Set<Symptom>>. Additionally, it implements the following operations:
-
Diagnosis#hasDisease(Disease disease)– Check if the application contains thediseaseinput by users -
Diagnosis#getSymptoms(Disease disease)– Return alistof all the relatedsymptomsof adiseaseinput by users -
Diagnosis#getDiseases()– Return alistof existingdiseasesfrom the database -
Diagnosis#addMatcher(Disease disease, Set<Symptom> symptoms)– Store a particulardiseasewith its set ofsymptomsin database. -
Diagnosis#predictDisease(Set<Symptom> symptoms)– Predict adiseasefor a set ofsymptomsinput by users.
These operations are exposed in the DiagnosisModel interface as
DiagnosisModel# hasDisease(Disease disease),
DiagnosisModel#getSymptoms(Disease disease), DiagnosisModel#getDiseases(),
DiagnosisModel#addMatcher(Disease disease, Set<Symptom> symptoms) and
DiagnosisModel#predictDisease(Set<Symptom> symptoms) respectively.
Given below is an example usage scenario and how the diagnosis mechanism behaves at each step:
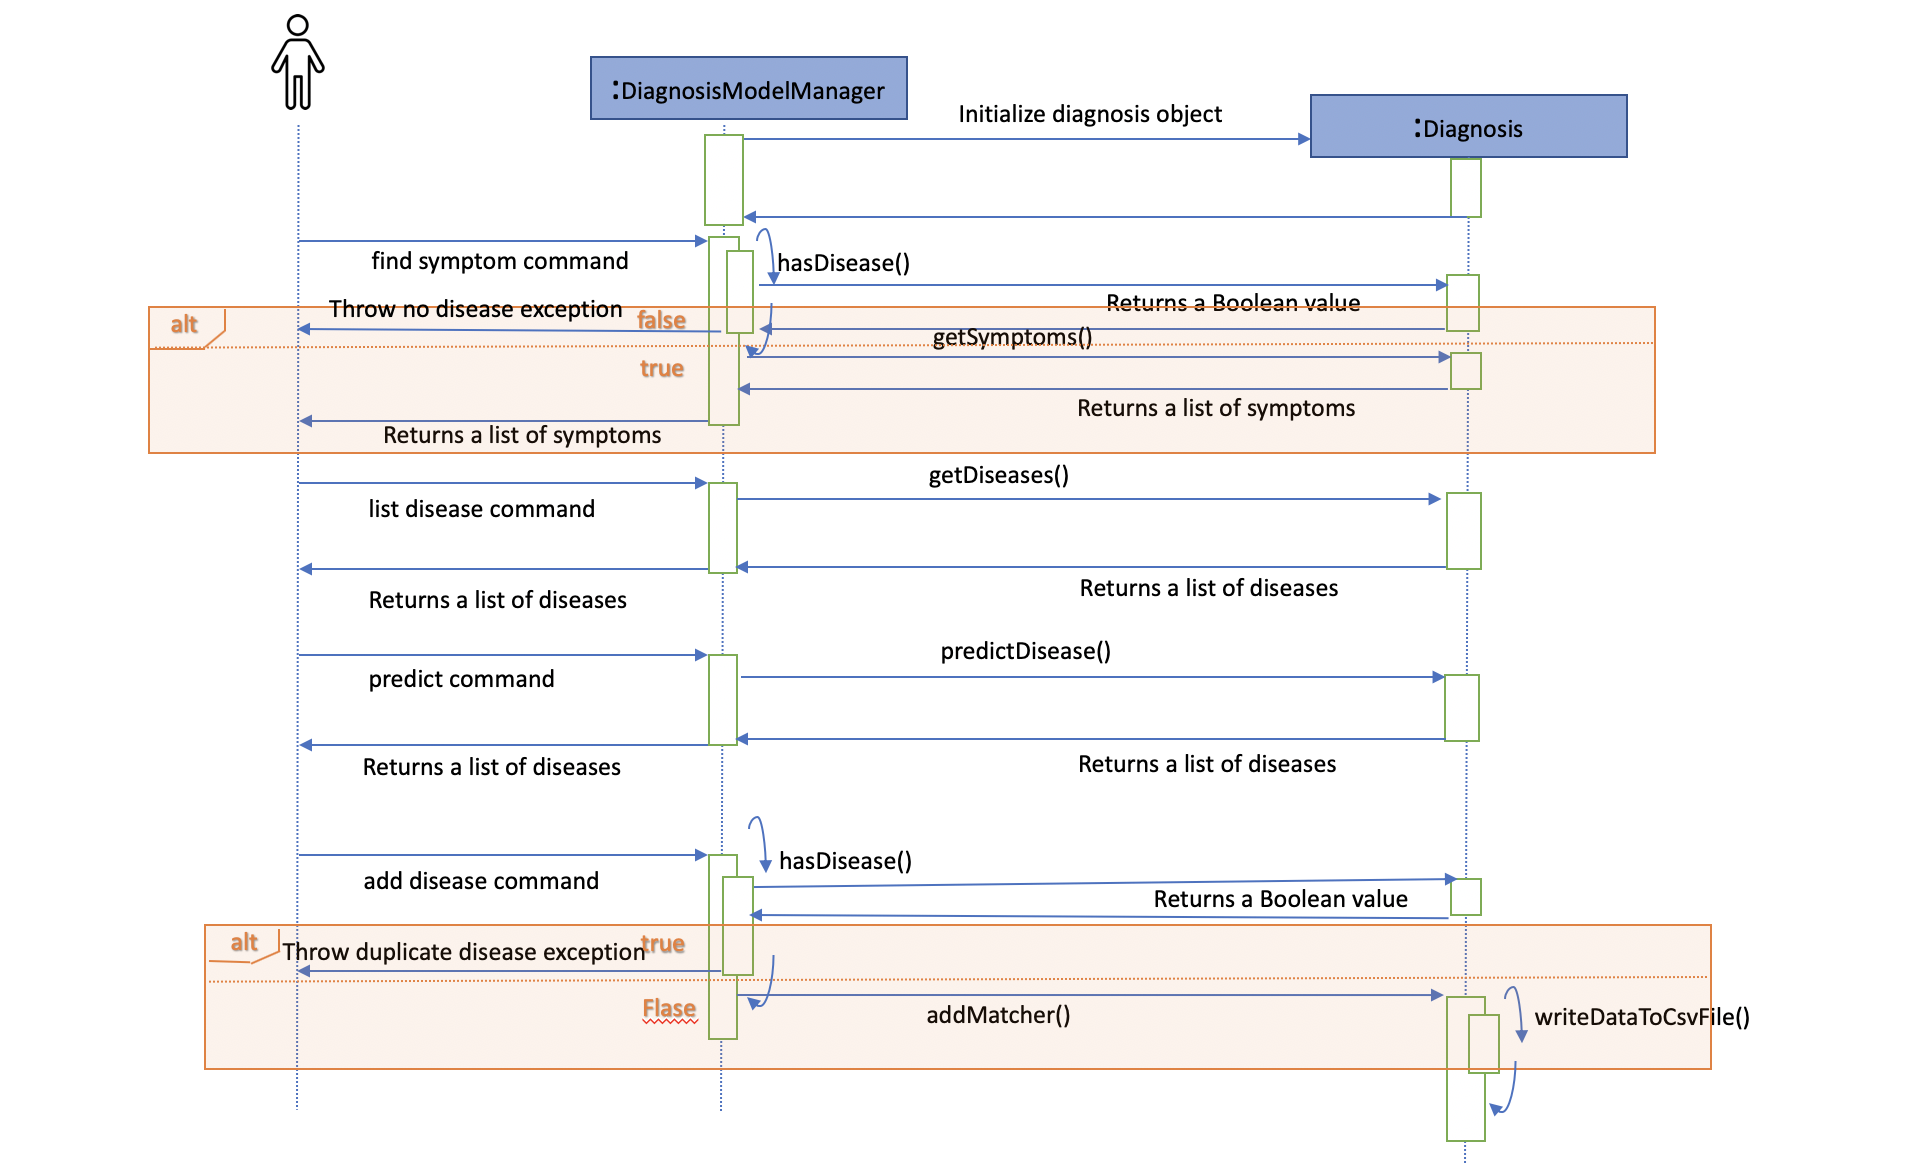
Step 1. The user launches the application for the first time. The Diagnosis will be instantiated and its
private attribute matcher will be initialized by calling the static method Diagnosis#readDataFromCsvFile().
Step 2. The user executes find disease Influenza command to get symptoms of “Influenza” stored in the patient book.
The find disease command calls DiagnosisModel#hasDisease(Disease disease) first, if the return Boolean value is false,
the user will be notified with a command exception thrown . If the return value is true, it will continue to call
DiagnosisModel#getSymptoms(Disease disease) and get all the symptoms related to “Influenza” in a List<Symptom>.
Step 3. If the disease is not present in the database record, the user can execute
add disease d/Influenza s/ncoordination s/fever s/pleuritic pain… command to insert the data into the database record.
Now, the add disease command calls DiagnosisModel#addMatcher(Disease disease, Set<Symptom> symptoms).
Now it will call the static method writeDataFromCsvFile(Disease disease, Set<Symptom> symptoms) which returns
a Hashmap of type HashMap<Disease, Set<Symptom>> and assigns it to this.matcher to update the private attribute.
    /**
     * Adds a disease and its related symptoms into the database
     *
     * @param disease  disease input.
     * @param symptoms related symptoms.
     */


    public void addMatcher(Disease disease, Set<Symptom> symptoms) {
        requireNonNull(disease);
        requireAllNonNull(symptoms);
        boolean hasDisease = this.hasDisease(disease);
        if (!hasDisease) {
            this.matcher = writeDataToCsvFile(disease, symptoms);
        }
    }
Step 4. The user executes list disease command to get a list of diseases stored in the patient book.
The list disease command calls DiagnosisModel#getDiseases() which returns a list of diseases present in the
key set of matcher.
Step 5. Now the user decides to execute the command predict to search for a disease in database that
matches with input symptoms. This command calls DiasnosisModel#predictDisease(Set<Symptom>) which returns a list
of diseases that are mapped to a set of symptoms containing the given set.
    /**
     * Predicts a disease with a given set of symptoms.
     *
     * @param symptoms symptoms input.
     * @return a list of qualified diseases.
     */
    public List<Disease> predictDisease(Set<Symptom> symptoms) {
        requireAllNonNull(symptoms);
        List<Disease> diseases = this.matcher.keySet().stream()
                .filter(disease -> this.matcher.get(disease).containsAll(symptoms)).collect(Collectors.toList());
        diseases.sort(Comparator.comparing(Disease::toString));
        return diseases;
    }
3.3.2. Design Considerations
Aspect: Disease-symptom matching data structures
-
Alternative 1 (current choice): Use a
HashMapwhere thekeyandvalueare the disease and set of related symptoms respectively.-
Pros: Better performance in terms of efficiency; duplicate values are also eliminated.
-
Cons: Difficult for other developers to understand.
-
-
Alternative 2: Define a
Matchclass with two private attributes representing the disease and a set of related symptoms, then maintain alistofMatchobjects.-
Pros: Easy for new developers to understand when disease-symptom pairs are encapsulated in an object.
-
Cons: May take up more memory, leading to performance issues.
-
Aspect: Searching algorithm to support disease prediction operation
-
Alternative 1 (current choice): Use
streamto search and collect all potential diseases.-
Pros: Easy to implement and easy for new developers to understand.
-
Cons: May have performance issues in terms of lower efficiency.
-
-
Alternative 2: Use a more systematic way to determine the suitability of each disease by calculating the similarity of its pre-existing set of symptoms and the set of symptoms given by users.
-
Pros: More accurate in determining the correct diseases.
-
Cons: Hard to implement and understand.
-
3.4. Deletion of Entries from Working Dataset
3.4.1. Current Implementation
Instances of Person are currently being deleted via soft-delete: setting the instance variable exists to false.
Instances of ScheduleEvent are currently being deleted directly: removing the objects themselves altogether from the
data structure encapsulated within Schedule.
3.4.2. Design Considerations
Aspect: Deletion of Person or ScheduleEvent Entries
-
Alternative 1: Deletion is accomplished via soft-delete.
-
This was chosen for deleting patients from the address book in order to ensure that a patient can never be permanently removed. Preventing deletion ensures that even deceased patients may have their information accessed, and guarantees that accidental deletion will never lead to important patient data being lost. Implementation is done via the addition of an
existsfield in the Person class. -
Using this approach for deleting appointments from the schedule will work but is unnecessary as appointment information is not nearly as sensitive as patient data.
-
-
Alternative 2: Person deletion is accomplished via actual deletion from the person list.
-
Patient data is no longer recoverable after deletion (unless undo/redo is implemented). This is the approach chosen for deleting appointments from the schedule instead, since this information may easily be recovered and is not nearly as sensitive as a patient’s medical information.
-
3.5. Undo/Redo (Coming in v2.0)
3.5.1. Proposed Implementation
Undo/Redo is accomplished using VersionedAddressBook and VersionedSchedule. This is encapsulated in the
ApplicationDataState class.
3.5.2. Design Considerations
Aspect : How undo & redo executes
-
Alternative 1 (current choice): Saves the entire address book and schedule.
-
Pros: Easy to implement.
-
Cons: May have performance issues in terms of memory usage.
-
-
Alternative 2: Individual command knows how to undo/redo by itself.
-
Pros: Will use less memory (e.g. for
delete, just save the person or event being deleted). -
Cons: We must ensure that the implementation of each individual command are correct.
-
Aspect: Data structure to support the undo/redo commands
-
Alternative 1 (current choice): Use a list to store the history of address book and schedule states.
-
Pros: Easy for new Computer Science student undergraduates to understand, who are likely to be the new incoming developers of our project.
-
Cons: Logic is duplicated twice. For example, when a new command is executed, we must remember to update
HistoryManager,VersionedScheduleandVersionedAddressBook.
-
-
Alternative 2: Use
HistoryManagerfor undo/redo-
Pros: We do not need to maintain a separate list, and just reuse what is already in the codebase.
-
Cons: Requires dealing with commands that have already been undone: We must remember to skip these commands. Violates Single Responsibility Principle and Separation of Concerns as
HistoryManagernow needs to do two different things.
-
3.6. Logging
We are using java.util.logging package for logging. The LogsCenter class is used to manage the logging levels and logging destinations.
-
The logging level can be controlled using the
logLevelsetting in the configuration file (See Section 3.7, “Configuration”) -
The
Loggerfor a class can be obtained usingLogsCenter.getLogger(Class)which will log messages according to the specified logging level -
Currently log messages are output through:
Consoleand to a.logfile.
Logging Levels
-
SEVERE: Critical problem detected which may possibly cause the termination of the application -
WARNING: Can continue, but with caution -
INFO: Information showing the noteworthy actions by the App -
FINE: Details that is not usually noteworthy but may be useful in debugging e.g. print the actual list instead of just its size
3.7. Configuration
Certain properties of the application can be controlled (e.g App name, logging level) through the configuration file (default: config.json).
3.8. Drug Database Search
This feature allows the user to view pharmacological information about medical drugs currently licensed for sale in Singapore.
3.8.1. Current Implementation
The execution of a drug database search via the find drug command takes place in the following manner:
-
The user enters the command
find drug [drugname], which is parsed byFindCommandParserto ensure that it has a single argument only -[drugname]- and that the argument contains only uppercase and lowercase alphabets. -
If errors are found in the input, a
ParseExceptionis thrown and the user sees an error message containing the proper command syntax. If the input is valid, aFindCommandis generated with a trimmed, lowercase version of[drugname]as its search string, andDRUGas its command type. -
FindCommandis executed through itsexecute()method, and calls the staticDrugSearch.find()method with the search string as an argument. -
The
DrugSearch.find()method ensures that the search string does not match any of a list of generic words like "syrup" or "tablet" which are not suitable search phrases, as they would generate hundreds of results. If the check fails, a specific error string is returned, whereupon theFindCommandobject throws a command exception, notifying the user that their search string is too generic. -
If the check passes, the
DrugSearch.find()method creates aDrugCsvUtilobject as a local variable, passing in the search string as an input to its constructor. TheDrugCsvUtilobject now corresponds to that search string only. -
The
DrugCsvUtilcontains anextMatchingResultmethod which reads a static drug database stored in "datasetForDrugs.csv" (formatted in UTF-8) from top to bottom, and each time it is called, it returns the next matching result from the database in the form of aString[]. Once there are no matching results, it begins to returnnull. -
The DrugSearch.find() method adds the matching results returned by the
DrugCsvUtilto a static cache, one after the other. Once it receivesnullas a return value, it formats just the Name, Classification and Active Ingredient(s) of the drug results in the cache into aStringof search results and returns it toFindCommand, which displays them. The full information can be displayed using themoreinfocommand (discussed later). If the cache is empty (i.e. there were no matches in the database),DrugSearch.find()returns a specific error String instead, whereuponFindCommandthrows aCommandException, and the user sees an error message indicating that no results were found. -
The cache is not cleared at the end of the search: instead, it is cleared when a _new_search is initiated, in order to accommodate the
moreinfocommand. -
When the results are displayed to the user in the form of a numbered list, they have the option of entering the command
moreinfo [RESULTNO]to view more information about any of the results. -
The argument of the command is parsed by
MoreInfoCommandParserto ensure that it is numeric, not less than or equal to zero, and is less than 10,000. If the parse fails, aParseExceptionis thrown and the user sees the error message that corresponds to the problem with their input. -
If the parse is successful, a
MoreInfoCommandobject is created, which executes through itsexecute()method, and callsDrugSearch.moreInfo()with the index number as its argument. -
DrugSearch.moreInfo()checks that the index is in the cache of results from the most recent search. If the cache is empty, this means that the user has not carried out a single drug search yet, or that the most recent drug search turned up no results. In these cases, a specific error string is returned, andMoreInfoCommandthrows aCommandException, and the user sees the appropriate error message. -
If the index is contained in the cache, the full information about the corresponding drug (seven categories of information) is formatted into a
Stringresult and returned, which is then displayed.
Note: The drug database is updated as of September, 2018.
The feature has been implemented using the OpenCSV library, which offers tools for manipulating .csv (Comma Separated Values) files.
3.8.2. Design Considerations
Aspect : How to format search results
-
Alternative 1 (current choice): Displays only partial information about each drug in the initial search results.
-
Pros: Prevents search results from being several pages long, and verbose.
-
Cons: Requires a separate command to be implemented for full information about any particular result to be displayed
-
-
Alternative 2: Display all seven categories of information about each drug in the initial results.
-
Pros: Easy to implement.
-
Cons: Results will be very long, and contain information that the user may not actually need.
-
Aspect : How to read the drug database
-
Alternative 1 (current choice): Create a separate I/O utility class (
DrugCsvUtil) to read directly from the file each time a search is carried out-
Pros: Runs fast, and is modular.
-
Cons: Filepath-related code can break if the working directory changes upon packaging into jar.
-
-
Alternative 2: Read contents of file onto memory in the form of a
HashMap<>-
Pros: File only has to be read once, and the contents can be easy manipulated since they are in the form of mapped pairs stored as a class variable.
-
Cons: Causes the program to become very slow, as 2MB of data must be read into memory.
-
Aspect : How moreinfo works
-
Alternative 1 (current choice):
moreinfocan be used repeatedly, but only on one result at a time.-
Pros: Easy to implement.
-
Cons: May cause user to have to recall a long list of index numbers if they want to see more information about multiple results.
-
-
Alternative 2:
moreinfoaccepts multiple indices in a single run of the command.-
Pros: Will create efficiency for the user.
-
Cons: Difficult to implement, particularly if a mix of valid and invalid indices are entered as arguments.
-
4. Documentation
We use asciidoc for writing documentation.
| We chose asciidoc over Markdown because asciidoc, although a bit more complex than Markdown, provides more flexibility in formatting. |
4.1. Editing Documentation
See UsingGradle.adoc to learn how to render .adoc files locally to preview the end result of your edits.
Alternatively, you can download the AsciiDoc plugin for IntelliJ, which allows you to preview the changes you have made to your .adoc files in real-time.
4.2. Publishing Documentation
See UsingTravis.adoc to learn how to deploy GitHub Pages using Travis.
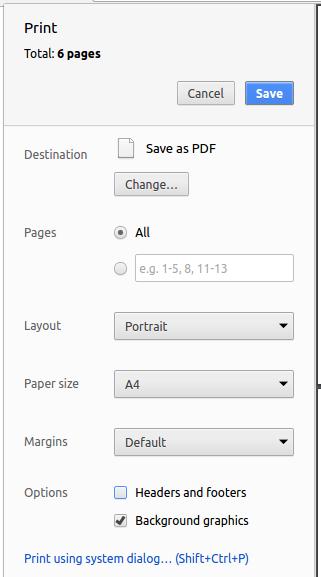
4.3. Converting Documentation to PDF format
We use Google Chrome for converting documentation to PDF format, as Chrome’s PDF engine preserves hyperlinks used in webpages.
Here are the steps to convert the project documentation files to PDF format.
-
Follow the instructions in UsingGradle.adoc to convert the AsciiDoc files in the
docs/directory to HTML format. -
Go to your generated HTML files in the
build/docsfolder, right click on them and selectOpen with→Google Chrome. -
Within Chrome, click on the
Printoption in Chrome’s menu. -
Set the destination to
Save as PDF, then clickSaveto save a copy of the file in PDF format. For best results, use the settings indicated in the screenshot below.
4.4. Site-wide Documentation Settings
The build.gradle file specifies some project-specific asciidoc attributes which affects how all documentation files within this project are rendered.
Attributes left unset in the build.gradle file will use their default value, if any.
|
| Attribute name | Description | Default value |
|---|---|---|
|
The name of the website. If set, the name will be displayed near the top of the page. |
not set |
|
URL to the site’s repository on GitHub. Setting this will add a "View on GitHub" link in the navigation bar. |
not set |
|
Define this attribute if the project is an official SE-EDU project. This will render the SE-EDU navigation bar at the top of the page, and add some SE-EDU-specific navigation items. |
not set |
4.5. Per-file Documentation Settings
Each .adoc file may also specify some file-specific asciidoc attributes which affects how the file is rendered.
Asciidoctor’s built-in attributes may be specified and used as well.
Attributes left unset in .adoc files will use their default value, if any.
|
| Attribute name | Description | Default value |
|---|---|---|
|
Site section that the document belongs to.
This will cause the associated item in the navigation bar to be highlighted.
One of: * Official SE-EDU projects only |
not set |
|
Set this attribute to remove the site navigation bar. |
not set |
4.6. Site Template
The files in docs/stylesheets are the CSS stylesheets of the site.
You can modify them to change some properties of the site’s design.
The files in docs/templates controls the rendering of .adoc files into HTML5.
These template files are written in a mixture of Ruby and Slim.
|
Modifying the template files in |
5. Testing
5.1. Running Tests
There are three ways to run tests.
| The most reliable way to run tests is the 3rd one. The first two methods might fail some GUI tests due to platform/resolution-specific idiosyncrasies. |
Method 1: Using IntelliJ JUnit test runner
-
To run all tests, right-click on the
src/test/javafolder and chooseRun 'All Tests' -
To run a subset of tests, you can right-click on a test package, test class, or a test and choose
Run 'ABC'
Method 2: Using Gradle
-
Open a console and run the command
gradlew clean allTests(Mac/Linux:./gradlew clean allTests)
| See UsingGradle.adoc for more info on how to run tests using Gradle. |
Method 3: Using Gradle (headless)
Thanks to the TestFX library we use, our GUI tests can be run in the headless mode. In the headless mode, GUI tests do not show up on the screen. That means the developer can do other things on the Computer while the tests are running.
To run tests in headless mode, open a console and run the command gradlew clean headless allTests (Mac/Linux: ./gradlew clean headless allTests)
5.2. Types of tests
We have two types of tests:
-
GUI Tests - These are tests involving the GUI. They include,
-
System Tests that test the entire App by simulating user actions on the GUI. These are in the
systemtestspackage. -
Unit tests that test the individual components. These are in
seedu.address.uipackage.
-
-
Non-GUI Tests - These are tests not involving the GUI. They include,
-
Unit tests targeting the lowest level methods/classes.
e.g.seedu.address.commons.StringUtilTest -
Integration tests that are checking the integration of multiple code units (those code units are assumed to be working).
e.g.seedu.address.storage.StorageManagerTest -
Hybrids of unit and integration tests. These test are checking multiple code units as well as how the are connected together.
e.g.seedu.address.logic.LogicManagerTest
-
5.3. Troubleshooting Testing
Problem: HelpWindowTest fails with a NullPointerException.
-
Reason: One of its dependencies,
HelpWindow.htmlinsrc/main/resources/docsis missing. -
Solution: Execute Gradle task
processResources.
6. Dev Ops
6.1. Build Automation
See UsingGradle.adoc to learn how to use Gradle for build automation.
6.2. Continuous Integration
We use Travis CI and AppVeyor to perform Continuous Integration on our projects. See UsingTravis.adoc and UsingAppVeyor.adoc for more details.
6.3. Coverage Reporting
We use Coveralls to track the code coverage of our projects. See UsingCoveralls.adoc for more details.
6.4. Documentation Previews
When a pull request has changes to asciidoc files, you can use Netlify to see a preview of how the HTML version of those asciidoc files will look like when the pull request is merged. See UsingNetlify.adoc for more details.
6.5. Making a Release
Here are the steps to create a new release.
-
Update the version number in
MainApp.java. -
Generate a JAR file using Gradle.
-
Tag the repo with the version number. e.g.
v0.1 -
Create a new release using GitHub and upload the JAR file you created.
6.6. Managing Dependencies
A project often depends on third-party libraries. For example, Address Book depends on the Jackson library for XML parsing. Managing these dependencies can be automated using Gradle. For example, Gradle can download the dependencies automatically, which is better than these alternatives.
a. Include those libraries in the repo (this bloats the repo size)
b. Require developers to download those libraries manually (this creates extra work for developers)
Appendix A: Product Scope
Target user profile:
-
has a need to manage a significant number of patient contacts and appointment details
-
prefers desktop apps over other types
-
can type fast
-
prefers typing over mouse input
-
is reasonably comfortable using CLI apps
Value proposition: manage patient data and appointment data faster than a typical mouse/GUI driven app
Appendix B: User Stories
Priorities: High (must have) - * * *, Medium (nice to have) - * *, Low (unlikely to have) - *
| Priority | As a … | I want to … | So that I can… |
|---|---|---|---|
|
new user |
see usage instructions |
refer to instructions when I forget how to use the App |
|
doctor |
add a new patient |
|
|
doctor |
delete a patient |
remove entries that I no longer need |
|
doctor |
find a patient by name |
locate details of patients without having to go through the entire list |
|
doctor |
add tags for patients |
summarise critical information about a patient |
|
doctor |
add appointment |
record my appointment schedule |
|
doctor |
list appointments |
know my appointment schedule |
|
doctor |
delete appointment |
manage my appointment schedule |
|
doctor |
predict disease based on given symptoms |
give correct diagnosis |
|
doctor |
search drug information |
know what prescriptions to give |
Appendix C: Use Cases
(For all use cases below, the System is the PatientBook and the Actor is the user, unless specified otherwise)
Use case: Delete patient
MSS
-
User requests to list patients
-
PatientBook shows a list of patients
-
User requests to delete a specific patient in the list
-
PatientBook deletes the person
Use case ends.
Extensions
-
2a. The list is empty.
Use case ends.
-
3a. The given patient ID is invalid.
-
3a1. PatientBook shows an error message.
Use case resumes at step 2.
-
Appendix D: Non Functional Requirements
-
Should work on any mainstream OS as long as it has Java
9or higher installed. -
Should be able to hold up to 1000 persons without a noticeable sluggishness in performance for typical usage.
-
A user with above average typing speed for regular English text (i.e. not code, not system admin commands) should be able to accomplish most of the tasks faster using commands than using the mouse.
Appendix F: Instructions for Manual Testing
Given below are instructions to test the app manually.
| These instructions only provide a starting point for testers to work on; testers are expected to do more exploratory testing. |
F.1. Launch and Shutdown
-
Initial launch
-
Download the jar file and copy into an empty folder
-
Double-click the jar file
Expected: Shows the GUI with a set of sample contacts. The window size may not be optimum.
-
-
Saving window preferences
-
Resize the window to an optimum size. Move the window to a different location. Close the window.
-
Re-launch the app by double-clicking the jar file.
Expected: The most recent window size and location is retained.
-
F.2. Mode
-
Switching to appointment management mode
-
Test case:
mode appointment
Expected: Software is switched to appointment management mode. Success message is shown in the display panel. Timestamp in the status bar is not updated. -
Test case:
mode damith
Expected: Software remains at the current mode. Error details are shown in the display panel. Timestamp in the status bar is not updated.
-
-
Switching to patient management mode
-
Test case:
mode patient
Expected: Software is switched to patient management mode. Success message is shown in the display panel. Timestamp in the status bar is not updated. -
Test case:
mode damith
Expected: Software remains at the current mode. Error details are shown in the display panel. Timestamp in the status bar is not updated.
-
F.3. Add
-
Adding a patient
-
Test case:
add patient n/Jonathan Smith p/98014555 e/jonathansmith@gmail.com a/10 New Bridge Street, Singapore 510319
Expected: Patient with name Jonathan Smith is added to the displayed list. Timestamp in the status bar is updated. -
Test case:
add n/Jonathan Smith p/98014555 e/jonathansmith@gmail.com a/10 New Bridge Street, Singapore 510319
Expected: No patient is added. Error details are shown in the status message. Status bar remains the same. -
Other incorrect delete commands to try:
add patient n/Jonathan Smith,add
Expected: Similar to previous.
-
-
Adding an appointment (initial input in command box)
-
Prerequisite: Patient with patient ID p0 and name Alex Yeoh is present. Patient with name Lizhi is not present.
-
Test case:
add appointment for Alex Yeoh tomorrow
Expected: A prompt window appears, displaying a list of available time slots during tomorrow (actual date based on the execution time of the command). -
Test case:
add appointment for p0 next week
Expected: A prompt window appears, displaying a list of available time slots during next week (actual dates based on the execution time of the command). -
Test case:
add appointment for Alex in 3 days
Expected: A prompt window appears, displaying a list of available time slots in 3 days (actual date based on the execution time of the command). -
Test case:
add appointment for Alex in 99999999999999999999999 weeks
Expected: No prompt window appears. Error details are shown in the status message. -
Test case:
add appointment for Lizhi next week
Expected: No prompt window appears. Error details are shown in the status message. -
Test case:
add appointment for Alex Yeoh elephant
Expected: No prompt window appears. Error details are shown in the status message. -
Other incorrect add appointment commands to try:
add for Alex Yeoh tomorrowadd appointment Alex Yeoh tomorrowadd appointment to Alex Yeoh tomorrow
Expected: Similar to previous.
-
-
Adding an appointment (further input in prompt windows)
-
Prerequisite: entered
add appointment for Alex Yeoh tomorrowin the command box, and a prompt window showing the list of available time slots during tomorrow (actual date based on the execution time of the command) has appeared. -
Test case:
-
For the first prompt window showing the list of available time slots, enter a valid time slot that is within the list shown, strictly in
DD/MM/YYYY hh:mm - hh:mmformat. For example, if17/11/2018 09:00 - 18:00is shown, enter17/11/2018 09:00 - 10:00.
Expected: Another prompt window appears, showingAny tags for this appointment? Otherwise, press enter to continue. -
For the second prompt window showing
Any tags for this appointment? Otherwise, press enter to continue, entersecondVisit.
Expected: Another prompt window appears, showingAny additional notes for this appointment? Otherwise, press enter to continue. -
For the third prompt window showing
Any additional notes for this appointment? Otherwise, press enter to continue, pressEnterwithout typing anything.
Expected: Appointment is created and displayed in the appointment list. Details of the appointment is shown in the status message.
-
-
Test case:
-
For the first prompt window showing the list of available time slots, enter a valid time slot that is within the list shown, strictly in
DD/MM/YYYY hh:mm - hh:mmformat. For example, if17/11/2018 10:00 - 18:00is shown, enter17/11/2018 11:00 - 12:00.
Expected: Another prompt window appears, showingAny tags for this appointment? Otherwise, press enter to continue. -
For the second prompt window showing
Any tags for this appointment? Otherwise, press enter to continue, enterThisIsAVeryLongTagThatIsNotActuallyAcceptedByTheProgramme.
Expected: No further prompt window appears. No appointment is created. Error details are shown in the status message.
-
-
Test case:
-
For the first prompt window showing the list of available time slots, enter a time slot that is not within the list shown, strictly in
DD/MM/YYYY hh:mm - hh:mmformat. For example, if17/11/2018 10:00 - 18:00is shown, enter17/11/2018 06:00 - 08:00.
Expected: No further prompt window appears. No appointment is created. Error details are shown in the status message.
-
-
Test case:
-
For the first prompt window showing the list of available time slots, enter a time slot that is within the the list shown, but with start time later than the end time, strictly in
DD/MM/YYYY hh:mm - hh:mmformat. For example, if17/11/2018 10:00 - 18:00is shown, enter17/11/2018 11:00 - 10:00.
Expected: No further prompt window appears. No appointment is created. Error details are shown in the status message.
-
-
Other incorrect prompt window inputs to try:
-
For time slot prompt window:
35/12/2018 12:00 - 13:0015/15/2018 12:00 - 13:0017/11/2018 12:88 - 14:0017/11 10:00 - 12:
Expected: Similar to previous. -
For tag prompt window:
[],yes
Expected: Similar to previous.
-
-
-
Adding a Disease
-
Test case:
add disease d/acne s/pustules s/blackheads
Expected: Disease acne with its symptoms including pustules and blackheads is added. This can be verified with find command. -
Test case:
add disease d/autism s/loneliness
Expected: Disease autism with its symptom loneliness is added. This can be verified with find command. -
Test case:
add disease d/obesity d/obesities s/overweight
Expected: Disease will not be added. Error message will be shown in the CommandResult box. -
Test case:
add disease d/averylongdiseaseparameter s/dummySymptom
Expected: Disease will not be added. Error message will be shown in the CommandResult box. -
Test case:
add disease d/invalid,disease s/dummySymptom
Expected: Disease will not be added. Error message will be shown in the CommandResult box.
-
F.4. Select
-
Selecting a patient(Assume that only patient p0 is present in the person list panel)
-
Test case:
select patient p0
Expected: Patient p0 is selected. Its card lights up with a blue color. The details of patient p0 are shown in the person browse panel. Success message is shown in the display panel. Timestamp in the status bar is not updated. -
Test case:
select p0
Expected: No patient is being selected. Error details are shown in the display panel. Timestamp in the status bar is not updated. -
Other incorrect select patient commands to try:
select patient 0,select patient p1,select patient e0
Expected: Similar to previous
-
-
Selecting an appointment(Assume that only appointment e0 is present in the appointment panel)
-
Test case:
select appointment e0
Expected: Appointment e0 is selected. Its card lights up with a blue color. The note of appointment e0 are shown in the appointment note panel. Success message is shown in the display panel. Timestamp in the status bar is not updated. -
Test case:
select e0
Expected: Expected: No appointment is being selected. Error details are shown in the display panel. Timestamp in the status bar is not updated. -
Other incorrect select patient commands to try:
select appointment 0,select appointment e1,select appointment p0
Expected: Similar to previous
-
F.5. Delete
-
Deleting a patient
-
Test case:
delete patient p0
Expected: Patient with ID p0 is deleted from the displayed list. Timestamp in the status bar is updated. -
Test case:
delete p0
Expected: No patient is deleted. Error details are shown in the status message. Status bar remains the same. -
Other incorrect delete commands to try:
delete patient 0delete patient px(where x is larger than the the largest shown patient ID)
Expected: Similar to previous.
-
-
Deleting an appointment
-
Test case:
delete appointment e0
Expected: Appointment with ID e0 is deleted from the displayed list. Timestamp in the status bar is updated. -
Test case:
delete e0
Expected: No appointment is deleted. Error details are shown in the status message. Status bar remains the same. -
Other incorrect delete commands to try:
delete appointment 0delete appointment ex(where x is larger than the the largest shown appointment ID)
Expected: Similar to previous.
-
F.6. Clear
-
Clearing the appointment schedule
-
Test case:
clear appointment
Expected: All appointments are removed from the displayed list. Timestamp in the status bar is updated. -
Test case:
clear patient
Expected: No effect. Patient list is not cleared, and error details are shown in the status message. Status bar remains the same.
-
F.7. Edit
-
Editing a patient
-
Test case:
edit patient p5 n/Jonah Smith p/90885132
Expected: Patient with ID p5 now takes the name Jonah Smith, and his phone number is now changed to 90885132. Changes are reflected in the displayed list. Timestamp in the status bar is updated. -
Test case:
edit patient n/Jonah Smith p/90885132
Expected: No patient is modified. Error details are shown in the status message. Status bar remains the same. -
Test case:
edit patient p5 n/Jonah Smith p/51029310 a/
Expected: No patient is modified. Error details are shown in the status message. Status bar remains the same.
-
-
Editing an appointment
-
Test case:
edit appointment e53 p/p5 t/11/01/2019 12:00 - 13:30Expected: Appointment with ID e53 is now scheduled for patient with ID p5, and (if the new date does not clash with an existing appointment and takes place after the time now) will schedule it for 11th January 2019, from 1200 to 1330 hrs. -
Test case:
edit appointment p/p5 t/11/01/2019 12:00 - 13:30Expected: No appointment is modified. Error details are shown in the status message. Status bar remains the same.
-
F.8. List
-
Listing patients
-
Test case:
list patient
Expected: This displays the list of patients which have not been deleted. -
Test case:
list patient all
Expected: This lists all patients, including deleted ones.
-
-
Listing appointments
-
Test case:
list appointment
Expected: This displays the list of appointments which take place from now. -
Test case:
list appointment all
Expected: This lists all appointments, including those that took place in the past.
-
-
Listing diseases
-
Test case:
list disease
Expected: This displays the list of diseases which have been stored in alphabetic order.
-
F.9. Find
-
finding diseases
-
Test case:
find disease hIV
Expected: This displays the list of symptoms of hiv in alphabetic order. -
Test case:
find disease influenza
Expected: This displays the list of symptoms of influenza in alphabetic order. -
Test case:
find disease sad
Expected: No list of symptoms is displayed. The error message will be shown in the CommandResult box.
-
-
finding drugs
-
Test case:
find drug Lyrica
Expected: This displays a list of search results, consisting of the Name, Classification and Active Ingredient(s) of all matching drugs. -
Test case:
find drug syrupExpected: This displays the error message 'Your search keyword is too generic. It will lead to hundreds of results. Try a more specific keyword instead.' -
Test case:
find drug somedrug123Expected: This displays the error message 'Invalid command format!' followed by instructions on how to use thefindcommand. -
Test case:
find drug dfvwlubExpected: This displays the error message 'No results found. Try again with a different query.'
-
F.10. Seeing More Information About Drugs
-
Seeing more information about a search result
Note: The following test case will hold true only if the most recent drug searched
produced at least one result. In this example,
find drug Glycomet has been assumed to be the most recent drug search.
-
Test case:
moreinfo 1Expected: This displays additional information about the first search result. -
Test case:
moreinfo 3Expected: This displays the error message 'This result is not in the list'.
Note: The following two test cases will hold true regardless of what command was entered immediately prior.
-
Test case:
moreinfo -1Expected: This displays the error message 'Invalid command format! followed by instructions on how to use themoreinfocommand. -
Test case:
moreinfo 10000Expected: This displays the error message 'Invalid command format! followed by instructions on how to use themoreinfocommand.
Note: The following test case will hold true either if no drug search has been carried
out since the program was started, or if the most recent drug search produced no results
or was unsuccessful. In this example, find drug Niacin has been assumed to be
the most recent drug search.
-
Test case:
moreinfo 1Expected: This displays the error message 'Please carry out a search using "find drug [drugname]" first.'.
F.11. Predict
-
predicting diseases
-
Test case:
predict s/fever s/blackout
Expected: This displays the list of diseases containing the symptoms above in alphabetic order. -
Test case:
predict s/cry
Expected: No list of diseases is displayed. The error message will be shown in the CommandResult box. -
Test case:
predict s/
Expected: No list of diseases is displayed. The error message will be shown in the CommandResult box.
-